Transcode to a Non Legacy Format to Continue Using the Media in Premiere Pro
Summary: MOV file format seems one of supported native video formats. But you may fail to import some Apple QuickTime.mov files created by iPhone, GoPro, Canon camera, DJI drone, iMovie, and more. The best solution is converting or transcoding MOV with VideoProc Converter.
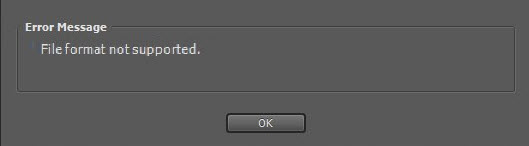
It is annoying when you fail to import MOV to Premiere. The error message goes like, "We are unable to open the file on disk", "File format not supported", "Unsupported format or damaged file", "The file has no audio or video streams"," Codec missing or unavailable" and "32-bit QuickTime support ending".
Other times, Premiere Pro and Premiere Elements only import audio from MOV files. After dragging the clip to timeline, you only see an audio track. Just sound, no video.
Why You Can't Import Mov File in Premiere Pro/Elements/Rush
Reason 1: The codec inside MOV is not supported by Premiere Pro/Elements/Rush. Although Adobe Premiere does support MOV containers, it is the codec that determines whether Premiere can properly import and edit MOV. Into the detail, the codec issues are complex depending on the source video, Premiere version, system version:
- iPhone recorded HEVC MOV video could be a challenge for Premiere
- Premiere dropped support for legacy QuickTime 7.x media from version 12.1 and higher
- Windows N editions lack certain media-related technologies, which fall short on MOV QT files
- QuickTime 7 does not support the AVCHD H.264 AVC format from Sony HD camcorders
It is quite intricate for each person with their own OS versions, Premiere versions, system configurations, and how the original video is encoded. But don't worry, since the major reason is incompatible codec, the most efficient solution is to transcode MOV codec for Premiere.
TL;DR: Convert MOV to Premiere-Friendly Codec Without Quality Loss
You can use VideoProc Converter to solve the MOV not working in Premiere problem. This universal video converter can transcode the codec and make it Premiere-friendly, be it H264/AVC or dedicated editing codec: ProRes. Then this tool will wrap the video and audio into MOV, MP4 or other container formats as per your personal preferences, and make sure it preserves the original quality.
Click the buttons below to download VideoProc Converter:
Reason 2: Your Adobe Premiere Pro/Elements version is too old to support the MOV files. For example, Adobe Premiere Pro CS5 supports some MOV files, but it doesn't provide native file support for MOV files recorded by JVC ProHD camcorders until the release of Adobe Premiere Pro CS5 software version 5.0.2. So, if you are using an old version, please to the newest version.
Reason 3: Your MOV files are corrupted. You can check whether your MOV file can be recognized and played properly using other programs. If not, repair it using a professional video repair tool.
But broadly speaking, the major cause is that some required codec is missing so that the file format is not supported. Therefore, transocding MOV file is the most effective yet easiest solution recommended by us.
Solution 1. Transcode MOV File to Adobe-Compatible Format
Analysis: Adobe Premiere Pro and Premiere Elements support MOV files, but MOV is a multimedia container format which contains various types of data encoded using one of several codecs. A MOV file can use MPEG-4, MJPEG, H.264, HEVC, GoPro CineForm, or other video codec for compression. To import MOV files successfully, Adobe Premiere Pro or Premiere Elements needs to be compatible with the specific codecs used in the MOV files. If not, you'll experience MOV importing error.
Transcoding should be a very helpful method. If you have Adobe Media Encoder, you can use it for video conversion. If you don't have that tool or can't manage to convert problematic MOV files to desired format with Media Encoder, you might as well try an easier-to-use yet powerful video converter and decoder - VideoProc Converter. To solve the MOV or other incompatible issues, free download and install VideoProc Converter on your PC or Mac computer, and follow the detailed steps below.
VideoProc Converter - One Stop Video Processing Tool for Premiere Pro/Elements/Rush
- Support 420+ formats, from MOV to the latest AV1
- Transode media files to Premiere-compatible codec and format
- Easy editing experience: cut, crop, merge, stabilize, remove fisheye distortion
- Support 3-level GPU acceleration to relieve the burden from CPU
Preparation: Free Download VideoProc Converter to Convert MOV to Editing-Friendly Codec.
Step 1. Open VideoProc Converter, click Video button, and then import target MOV file into this program by dragging-and-dropping or by clicking +Video button in the top left corner.
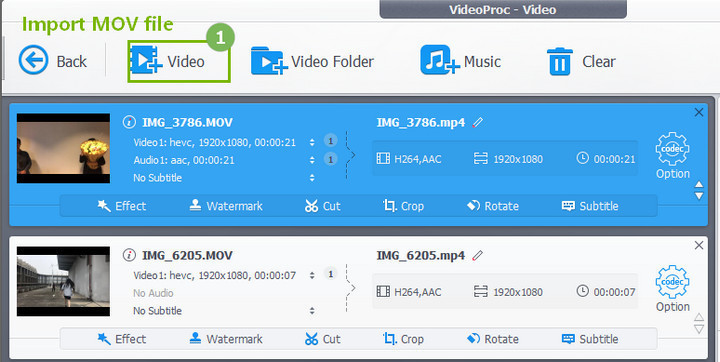
Step 2. Click the Video tab or Target Format at the bottom. Choose a format preset that Adobe Premiere Pro/Elements can support, for example, MP4 (H264, AAC), AVI, and MPEG2. And MP4 encoded by H264 is recommended. Optionally, you can click the gear icon to adjust frame rate, resolution, bit rate, and more.

Step 3. You can cut, crop, merge, rotate, change video speed, fix A/V out-of-sync problem and make some easy video edits in a linearly manner with since it is also a video processing program with full GPU acceleration technology.
Step 4. Hit RUN and it will begin fast video decoding, conversion and processing your MOV video at one go. Hardware acceleration can be enabled to speed up the processing, only if your computer has supported graphics cards.
Once done, import the resulting file to Adobe Premiere Pro or Premiere Elements and see if it can be imported and recognized as a video file.
Solution 2: Install QuickTime or Required Codec
QuickTime comes with many popular and general-purpose codecs, so installing QuickTime may be able to resolve import error caused by missing codec. After installing QuickTime, restart your Adobe Premiere Pro/Elements and check if it can import MOV video files now.
Step 1: Download QuickTime on your PC or Mac. Note: QuickTime 7 for Windows is no longer supported by Apple.
Step 2: Install Quicktime:
- You should read its License Agreement carefully, and scroll down to see the rest of the agreement.
- You should choose the setup type between Typical and Custom that should be decided by whether you are a common user or advanced user.
- Change the Destination Folder from Disk C to other disk to save space in C, and click Install.
Step 3: After finish installing QuickTime, you have to restart your Adobe Premiere Pro.
Step 4: Check Whether it can import MOV video files.
- Important Notice: QuickTime has been officially discontinued on Windows so there supposedly is a security risk. Windows 11/10 users may find it doesn't work. This is because Windows 11/10 does more security things than Windows 7 and Windows 8.1 do.
If you can't install QuickTime or still can't import MOV to Adobe Premiere Pro/Elements after installing QuickTime, you can download and install required codec from established sources to have a try. Before doing that, you'd better backup all your files because installing a new codec typically causes some video or audio files to become unreadable.
One more thing, Adobe suggests not downloading codec pack software to avoid codec conflicts.
Solution 3: Rename the File Extension
Depending on the source codec, another solution that some time works is to change the extension name. To fix import errors "The file has no audio or video streams" and "32-bit QuickTime support ending", you can rename the file extension from .mov to .mp4, .mpg, or other format.
This trick does get many users out of trouble. However, it isn't guaranteed to work. Some people still can't load files to Premiere Pro/Elements successfully:
- "I changed it to both avi and mp4. MP4 has an audio sync issue and avi pops open a window with a damage or unsupported format."
- "Can import now but just hear the sound and can't see video coz it gone green!"
- "I'm still not able to import file it's showing some 'the Importer reported a generic error'."
When it works, the possible reason is, the source codec just happen to be supported by the renamed container. In most cases, however, not all the container support the codec that are used to encode your source MOV file. Plus, the metadata and other data such as subtitles may be damaged.
Final Words
The major cause that Adobe Premiere Pro CC fails to import MOV files is that some required codec is missing and the file format is not supported. Therefore, transocding MOV file using VideoProc Converter is the most effective yet easiest solution recommended by us.
Besides converting from or to MKV, VideoProc Converter can handle over 370 different video and audio formats/codecs. Better still, it is an all-in-one tool for DVD ripping, video/audio conversion, video editing, downloading and recording. It is beginner-friendly, super fast and stable.
Source: https://www.videoproc.com/troubleshoot-adobe/solved-cant-import-mov-file-to-premiere-pro.htm
0 Response to "Transcode to a Non Legacy Format to Continue Using the Media in Premiere Pro"
Post a Comment